Pi Day 2019: Build your own alarm system
-
By:

At Cerner Engineering, we love to celebrate Pi Day. This day is not only a fun time to enjoy eating pie and reflecting on mathematical properties, but we also share big announcements internally for our developers conference, DevCon.
Drew a crowd to celebrate Pi Day this afternoon with snacks, lightning talks, and our DevCon 2018 theme reveal! #314day #cernerdevcon pic.twitter.com/wyy5eLKHVl
— Cerner Engineering (@CernerEng) March 14, 2018
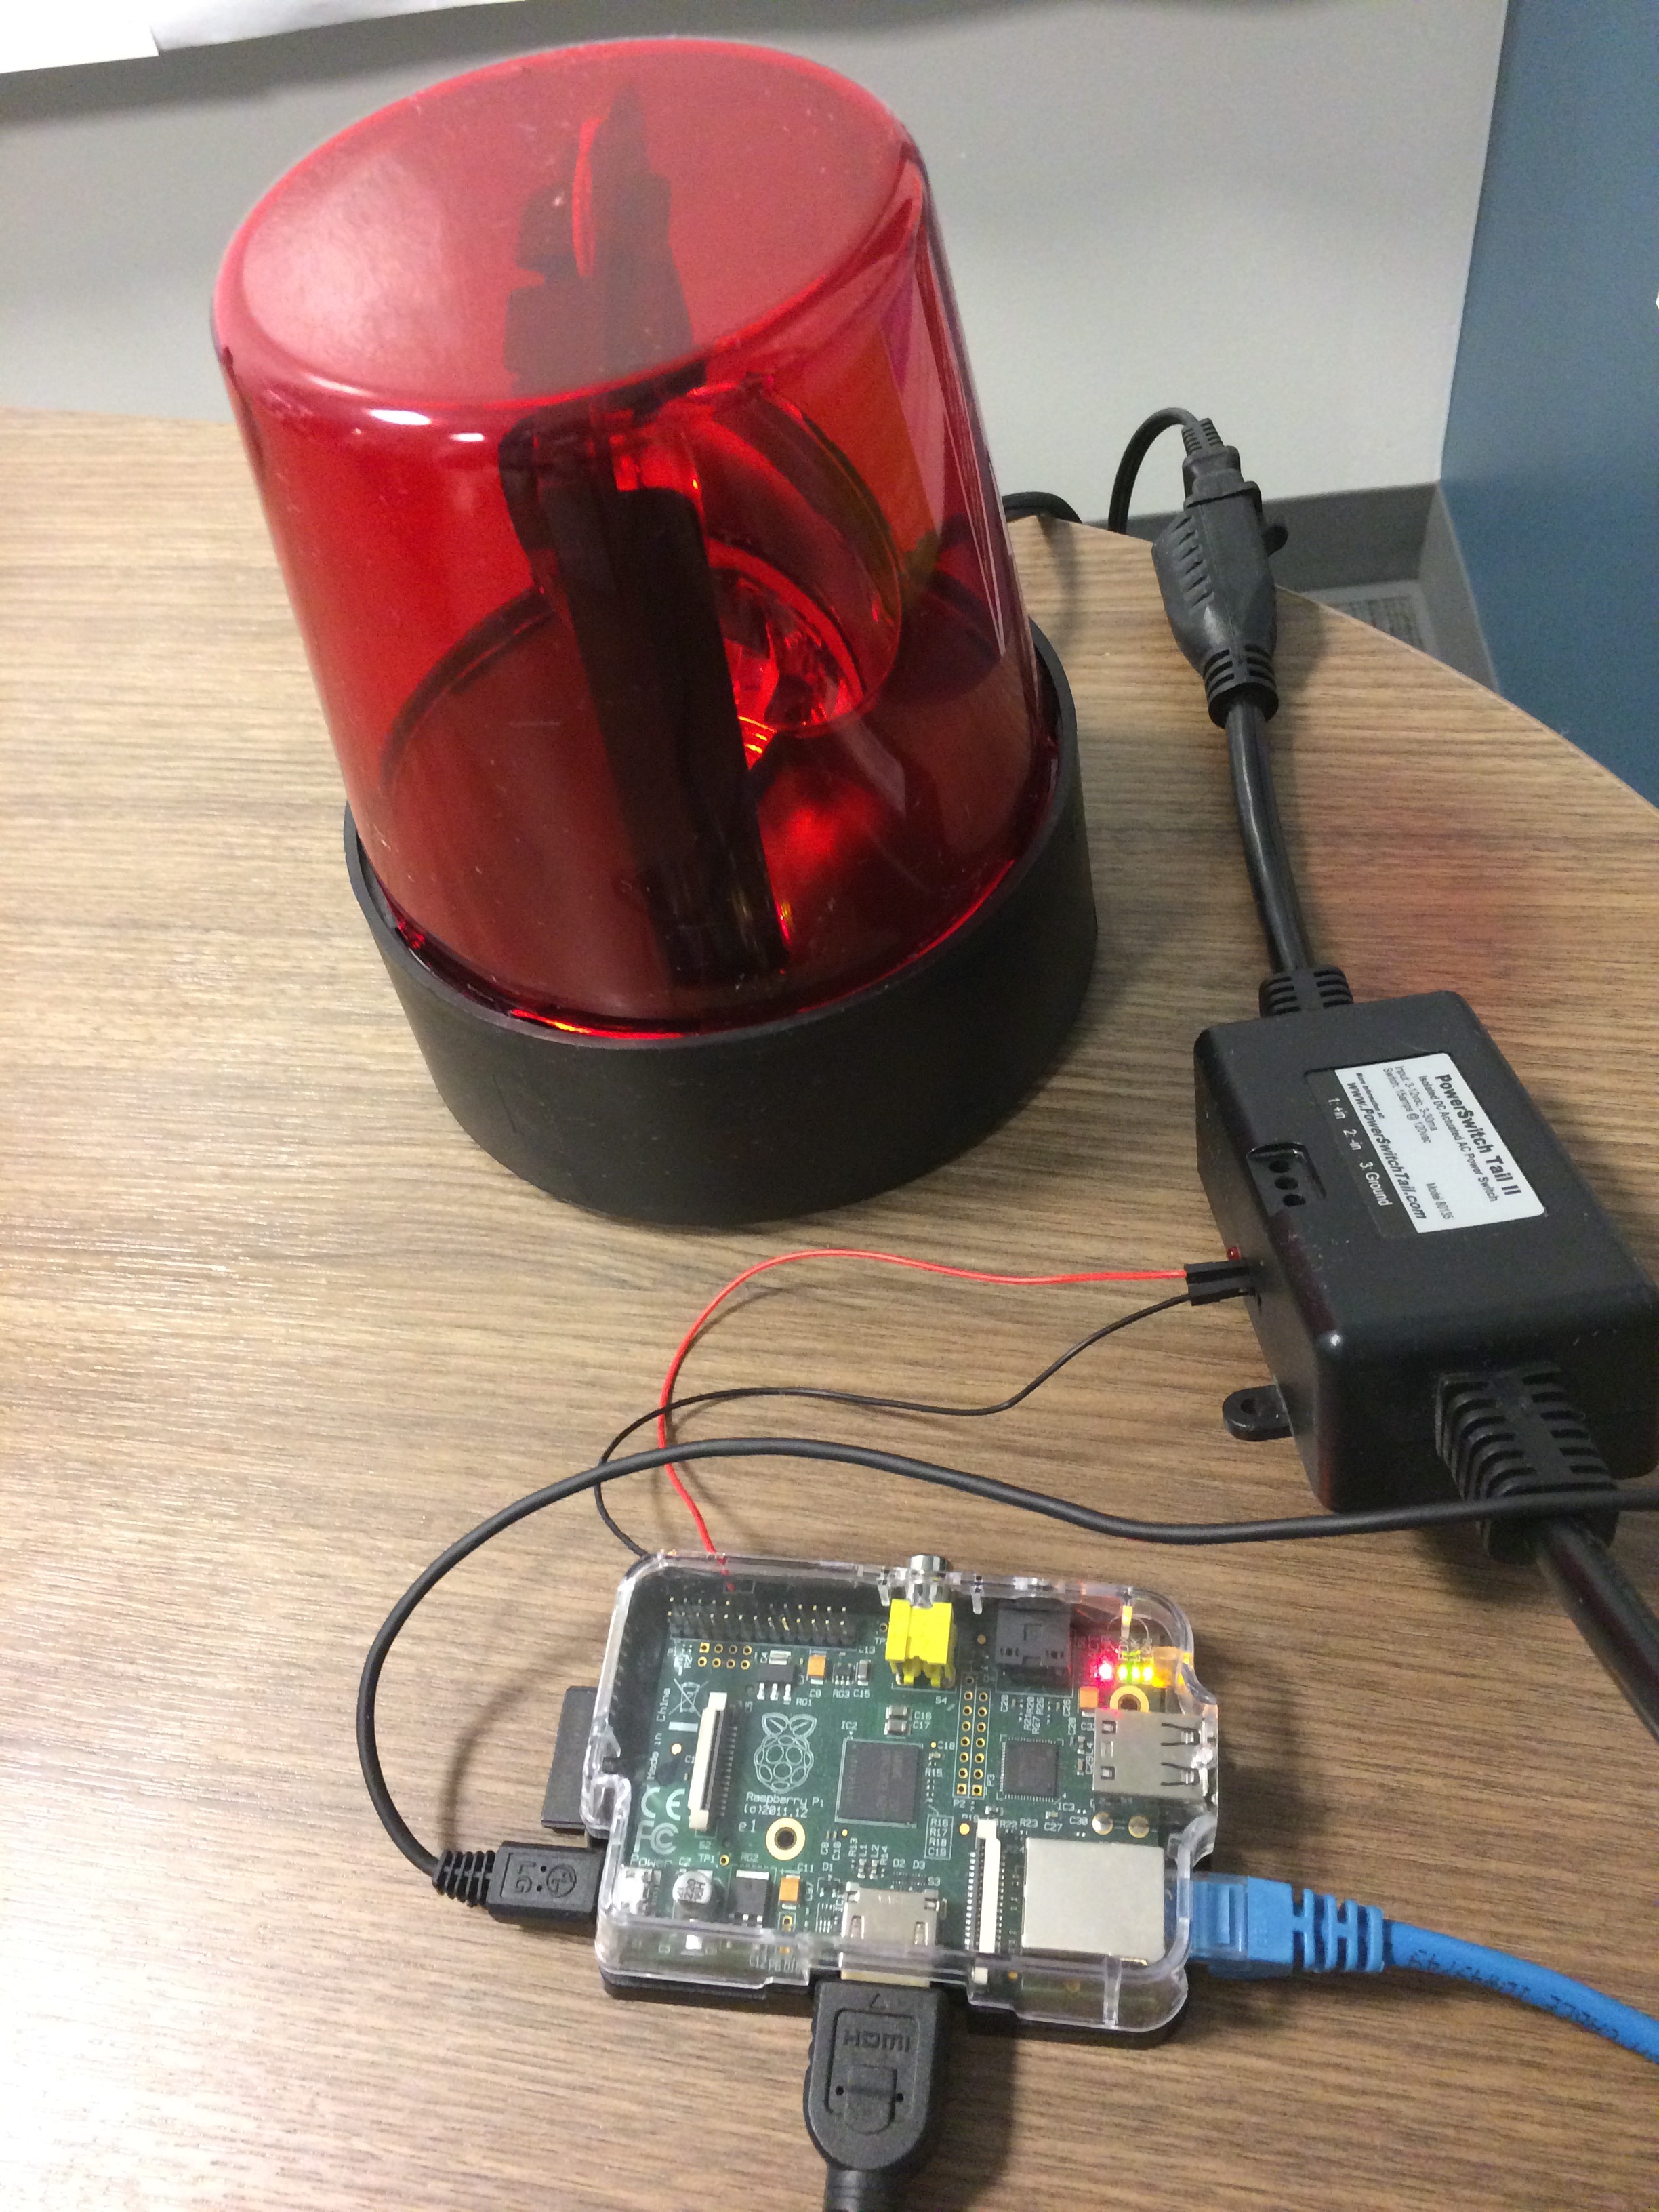
For this post, we thought it would be fun to share a simple example of how you can hook your existing monitoring system to a physical alarm system powered by a Raspberry Pi. This alarm will be a red spinning light, the universal symbol of “something is going wrong.” We will build a program that will integrate with New Relic to determine if there are issues in our environment. If there are any issues, it will trigger the alarm and your monitoring system will come alive!
Parts List
- Jumper wires - Wires that we will use to trigger the switch from your GPIO pins.
- Alarm light that is AC powered - There are several different types of fun alarm or party lights you could use. The important characteristic that we are seeking is an AC powered light, as we will use this to control its state. Many lights you will find are battery powered, which will not work for this example.
- PowerSwitch Tail or alternative - I have had this setup for quite some time, so I still have a PowerSwitch Tail, but looks like they may not be available by all providers. You can get other alternatives out there, where you can control an AC power switch safely through GPIO interactions.
- Raspberry Pi - I have an older model, but anything with a powered ethernet connection works well (ex. Raspberry Pi 3 Model B+), as we will be making remote HTTPS calls. If this is your first time getting a Raspberry Pi, there are great kits that include your power adapter and SD card (as you will need that too).
- RJ45 ethernet cable (optional) - We won’t leverage WiFi for this example, and simply use a ethernet cable for maintaining a network connection for the Raspberry Pi. You don’t need this if you already know how you plan to connect your Raspberry Pi to your existing network.
The Alarm
Once you have this setup, we are going to use the Raspberry Pi to control your AC output by communicating to the PowerSwitch Tail through our GPIO pins. A Go program will control the logic of flexing the alarm on or off by polling a monitoring system: New Relic. New Relic is a real-time monitoring platform that gives you powerful insights about the applications you are operating. One of the features of New Relic, is that you can build alerts about different indicators of your application (ex. high memory utilization of a service). These can be rolled up to an “incident” concept, when you have a violation on an alert condition. For this physical alarm, it made sense to pair it with this concept that we use from New Relic. Therefore, if you build something that would trigger human engagement with your alerts (like an incident), this alarm can generically pick these up, without you having to manage anything else.
The Code
Here is the code snippet of what we will implement. It is a Go program, which will interact with the GPIO pins using go-rpio. It will essentially run in a loop, and poll New Relic’s Alert API every minute. To ensure we aren’t running the alarm in the after-hours, we will also flex when this can trigger (ex. Mon - Friday, 9 - 5 PM).
First, we will build something that can invoke the New Relic Alerts API. This will offer a single function (hasOpenIncidents) that will dictate if there are any open incidents when checking with New Relic.
// New Relic Incident API type (just using including two of the fields as an example)
type Incident struct {
	Id       int   `json:"id"`
	OpenedAt int64 `json:"opened_at"`
}

// New Relic Incident API response type, which we will assess on having any items in the array for the alarm.
type IncidentsResponse struct {
	Incidents []Incident `json:"incidents"`
}

// Documented here: https://rpm.newrelic.com/api/explore/alerts_incidents/list
func hasOpenIncidents(apiKey string) bool {
	url := "https://api.newrelic.com/v2/alerts_incidents.json?only_open=true"
	spaceClient := http.Client{
		Timeout: time.Second * 15,
	}
	req, err := http.NewRequest(http.MethodGet, url, nil)
	if err != nil {
		log.Fatal(err)
	}
	req.Header.Set("X-Api-Key", apiKey)

	res, getErr := spaceClient.Do(req)

	// If there is a failure to calling New Relic (ex. timeout), simply logging and returning back
	// for a later retry
	if getErr != nil {
		log.Printf("Failed to get a response: %s", getErr)
		return false
	}

	incidentsResponse := IncidentsResponse{}
	jsonError := json.NewDecoder(res.Body).Decode(&incidentsResponse)
	if jsonError != nil {
		log.Fatal(jsonError)
	}

	return len(incidentsResponse.Incidents) > 0
}
We will then manage the GPIO pin state in a simple loop which will check to see if there are any open incidents. If so, it will set the pin to High, which will trigger the light switch. Otherwise it will set it to low. We will also include a handler for setting the pin to low when we terminate the application (ex. via a SIGTERM). Example of managing the state:
		// If there are any open New Relic incidents, set the pin to high
		if hasOpenIncidents(apiKey) {
			log.Print("Incidents detected, setting alarm.")
			pin.High()
		} else {
			log.Print("No incidents detected.")
			pin.Low()
		}
When you put it all together, the full picture of code looks like this (alarm.go):
package main

import (
	"encoding/json"
	"github.com/spf13/viper"
	"github.com/stianeikeland/go-rpio"
	"log"
	"net/http"
	"os"
	"os/signal"
	"syscall"
	"time"
)

// New Relic Incident API type (just using including two of the fields as an example)
type Incident struct {
	Id       int   `json:"id"`
	OpenedAt int64 `json:"opened_at"`
}

// New Relic Incident API response type, which we will assess on having any items in the array for the alarm.
type IncidentsResponse struct {
	Incidents []Incident `json:"incidents"`
}

// Documented here: https://rpm.newrelic.com/api/explore/alerts_incidents/list
func hasOpenIncidents(apiKey string) bool {
	url := "https://api.newrelic.com/v2/alerts_incidents.json?only_open=true"
	spaceClient := http.Client{
		Timeout: time.Second * 15,
	}
	req, err := http.NewRequest(http.MethodGet, url, nil)
	if err != nil {
		log.Fatal(err)
	}
	req.Header.Set("X-Api-Key", apiKey)

	res, getErr := spaceClient.Do(req)

	// If there is a failure to calling New Relic (ex. timeout), simply logging and returning back
	// for a later retry
	if getErr != nil {
		log.Printf("Failed to get a response: %s", getErr)
		return false
	}

	incidentsResponse := IncidentsResponse{}
	jsonError := json.NewDecoder(res.Body).Decode(&incidentsResponse)
	if jsonError != nil {
		log.Fatal(jsonError)
	}

	return len(incidentsResponse.Incidents) > 0
}

// Simple handler to set the pin to a LOW signal when terminating the application
func closeHandler(pin rpio.Pin) {
	c := make(chan os.Signal, 1)
	signal.Notify(c, os.Interrupt, syscall.SIGTERM)
	go func() {
		<-c
		log.Print("SIGTERM detected, setting pin off")
		pin.Low()
		os.Exit(0)
	}()
}

func main() {
	// Load configuration
	viper.SetConfigName("config")
	viper.AddConfigPath(".")
	configErr := viper.ReadInConfig()
	if configErr != nil {
		log.Panicf("Fatal error config file: %s \n", configErr)
	}
	apiKey := viper.GetString("new_relic.api_key")

	// Setup GPIO pin
	log.Print("Opening GPIO")
	err := rpio.Open()
	if err != nil {
		log.Panic("Unable to open GPIO", err.Error())
	}
	defer rpio.Close()

    // Mapping to BCM2835 pin 18, which is the physical 12 pin. For more information about pin mapping, you can see
    // how these are being mapped: https://github.com/stianeikeland/go-rpio/blob/v4.4.0/rpio.go#L35-L59
	pin := rpio.Pin(18)
	pin.Output()
	closeHandler(pin)

	for {
		// If it is after-hours, don't worry about triggering the alarm (trigger during: Mon - Fri, 9 - 5)
		t := time.Now()
		if (t.Weekday() >= 1 && t.Weekday() <= 5) && (t.Hour() < 9 || t.Hour() > 17) {
			pin.Low()
			log.Print("After hours, sleeping for 5 minutes before continuing...")
			time.Sleep(5 * time.Minute)
			continue
		}

		// If there are any open New Relic incidents, set the pin to high
		if hasOpenIncidents(apiKey) {
			log.Print("Incidents detected, setting alarm.")
			pin.High()
		} else {
			log.Print("No incidents detected.")
			pin.Low()
		}

		time.Sleep(1 * time.Minute)
	}
}
Building
For my example, I have this in a alarm.go file within my nr-pi-alarm directory. I then issue the following command:
env GOOS=linux GOARCH=arm GOARM=5 go build
This will produce a nr-pi-alarm you can then transfer to your Raspberry Pi for execution. One example of doing this is with scp:
# Will transfer it to the alarm directory for the pi user on the Raspberry Pi
scp nr-pi-alarm pi@INSERT_YOUR_RASPBERRY_PI_IP_ADDRESS:alarm
Wiring it up
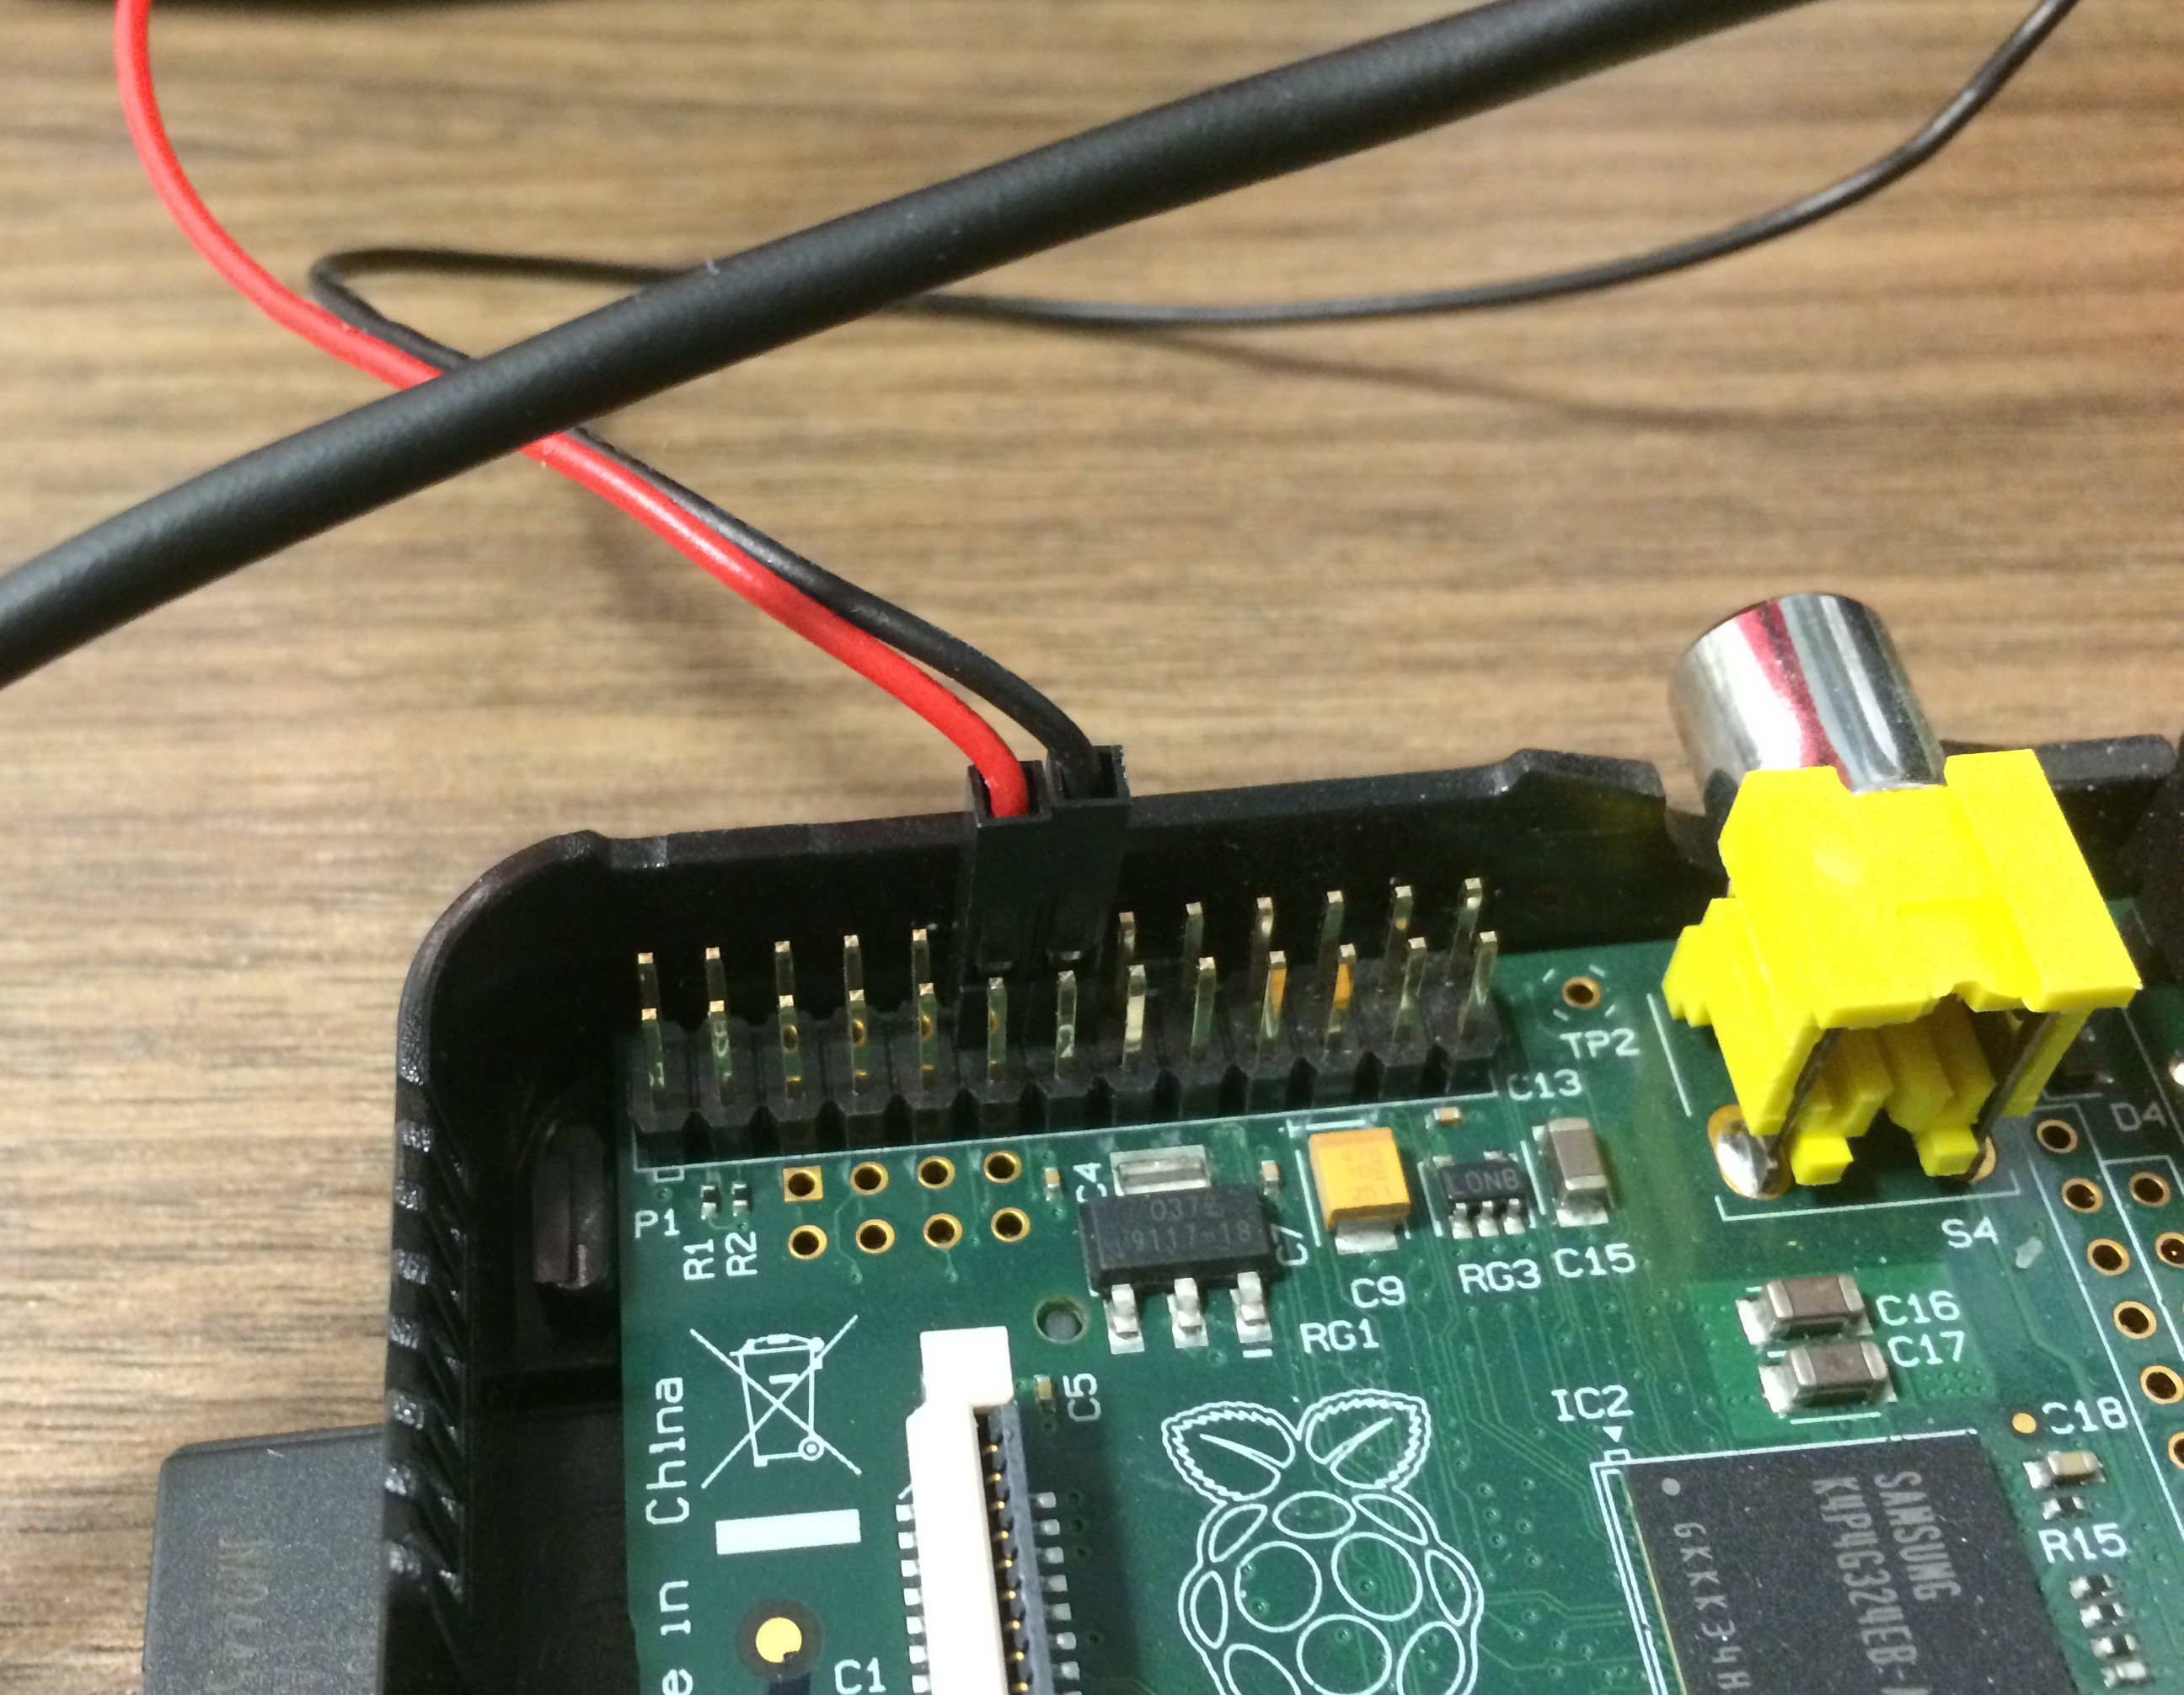
For this example, we are using the physical pins #12 and #14 (GPIO18 and GND). We will use our jumper wires to then hook this to the AC switch:
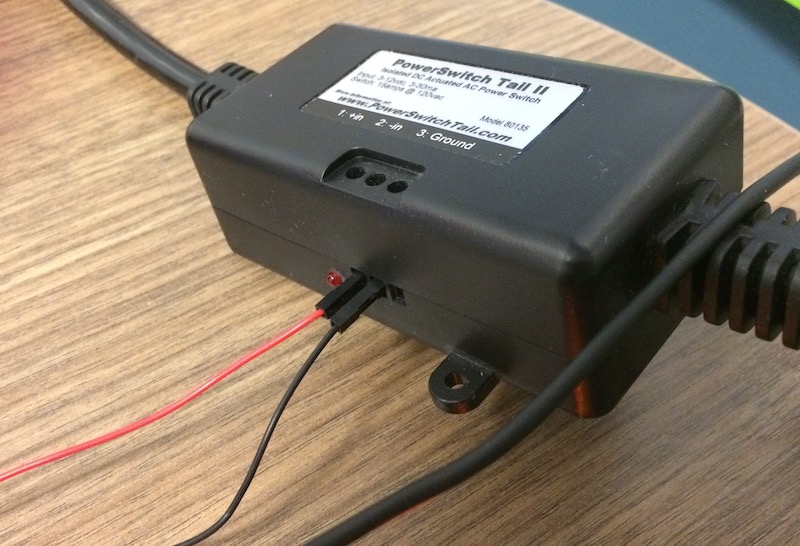
You will then hook your alarm light to the AC switch (PowerSwitch Tail). If the alarm light has its own on/off switch, turn it to on, as we don’t want this manual switch to block what our Raspberry Pi is going to control based on the flow of power.
Run it
After you have transferred the build to your pi, you can then configure the alarm to use your New Relic account. This is achieved by creating a config.yml file in your alarm directory which currently hosts the nr-pi-alarm program (set to 600 for file permissions):
new_relic:
  api_key: INSERT_NEW_RELIC_API_KEY_HERE
After you have configured it, simply invoke this to run the alarm:
$ ./nr-pi-alarm
2019/03/14 10:04:12 Opening GPIO
2019/03/14 10:04:26 Incidents detected, setting alarm.
Happy Pi Day
We hope you are having a great Pi Day and maybe this example will give you other ideas of what you can build to bring your systems alive. 😀